Thursday, August 30, 2007
Stay Tuned ...
Spending some time in Ashland so no posting for a few days ... but I'll be posting pics of some Halloween cards that I made last weekend on Monday ...
Sunday, August 26, 2007
Handmade Greetings ...
Here's another card I created to teach at class last week. I got the idea for this card from one of the cards we made at convention - but I wanted to use punches & chipboard so here's what I came up with ...


To make this 3 x 6 inch card, I started with a 6 x 6 inch piece of textured white cardstock. Next, I cut a 1/4 inch off one side to make room for the scalloped edge.
Scalloped Edge: Using a 3/16" corner rounder punch, I removed the 'guide' from the punch and start punching half-circles overlapping slightly along the edge of the cardstock in order to create a scallped edge.
Chipboard & Flower Embellishments: I used a couple pieces of chipboard from the On Board Blossoms and Basics chipboard set. For the small flower, I colored it using a sponge dauber and Certainly Celery craft (pigment) ink. For the larger circle, I colored it using a sponger dauber and Rose Red craft (pigment) ink - then coated with a layer clear embossing powder (melted with a heat tool of course) to create a shine. For the center, I stamped 'Handmade' from the 'Art by Design' set in Bashful Blue on a scrap of Whisper White cardstock and punched it out with a 1 1/4" circle punch and attached with glue dots. Finally, I punched a few So Saffron flowers using the Trio Flower punch.
To bring it all together, I used a piece of Celery ribbon and a clip from the Antique Brass Hodgepodge Hardware kit.
The final touch, a 1" x 6" strip of designer paper from the 'Cutie Pie' series.
Hope you like it!
Tuesday, August 21, 2007
Potpourri ...
So getting ready for stamp class this week I wanted to see what I could create using designer paper, chipboard & punches ... a little of everything! The fun thing about this card is you can mix n' match papers, punches, embellishments -- pretty much anything goes!


For this version of my potpourri card, I used Old Olive cardstock (5 1/4 x 5 1/4) and textured Soft Sky cardstock (5 x 5) ... I softened the edges of both using the a 3/16" corner rounder punch.
Flower #1: I started with a piece of chipboard from SU On Board Blossoms & Basics covered in a piece of prints designer paper in Rose Red.
A Tip: When covering a flower in chipboard - trace your chipboard onto the designer paper and make a small mark on the chipboard and paper so that you know where to line things up after you cut out the flower. Glue stick works great for adhering the paper to the chipboard and a sanding block will take off the rough edges and give a bit of a 'shabby chic' look.
Next, I stamped and punched different shapes to create the 2nd and 3rd flowers ...
Flower #2: I stamped a 5-petal flower from SU's 'In the Spotlight' set in Pumpkin Pie on shimmery white cardstock. The new 5-Petal Flower punch pops it out perfectly. I punched a second 5-petal flower out of Certainly Celery.
Flower #3: The final flower uses another image from 'In the Spotlight' stamped in Groovy Guava on Groovy Guava cardstock and punched out with the new Snow Blossom punch. I punched a second piece in Lovely Lilac for layering.
Flower Centers: For the flower centers - embellishments - a couple buttons (clear button backed with a piece of So Saffron designer paper punched out with a 1" circle punch), a rhinestone brad and a bit of dazzling diamonds glitter on a glue dot.
Last touch ... paper piercing the stems and stamping a greeting from SU's 'Dias Felices' set in Soft Sky.
Celebrate!
Sunday, August 19, 2007
Play Time ...
Ah, after a week of no real stamping time, today was full day in the stamp garage. After playing a bit, I came up with this for Sketch This Card challenge #22 ...

For this card, I wanted to play with some things I haven't used in awhile. I aged the YoYo Yellow cardstock with Tim Holtz Distress Ink in Old Paper. To break down the fibers in the Taken with Teal cardstock, I rubbed the strip of cs back-n-forth over the edge of my work counter then lightly tugged back and forth, working my way down the cardstock until the fibers were loose. All cardstock is distressed on the edges using the SU Cutter Kit.
I stamped the rocket ship (JudiKins) in stamped-off Taken with Teal and then overstamped the saying (Stampers Anonymous) in Basic Gray.
Wish I could remember where I picked up the 'astro boy' paper ... luv the stuff ...
Saturday, August 18, 2007
Stamp Garage Storage ...
No stamping today. Instead, we spent the day installing 4 new Craftsman tool chests to increase the storage in my Stamp Garage. Yeah!
The Stamp Garage Before ... saw horses worked great to hold up my door-turned-countertop on one side but didn't offer much in the way of efficient storage.


The Stamp Garage During ... had to move everything over to the 'class room' side of the garage in order to move the counters and put in the new Craftsman rollaways (tho' I'm not using the wheels).


The Stamp Garage After ... Clean! I'm still figuring out how best to use all the drawers but at least for now, I have a big open space for stamping.


Tomorrow will definitely be a stamping day!
Wednesday, August 15, 2007
Fab ...
Ever have one of those days where you go to stamp and nothing comes together? I had one of those nights last night ... I think my brain couldn't handle all the options & choices.
So, tonight, back to the stamp garage. I simplified my color pallette and here's what I came up with ...


I used the SU 'Fabulous Flowers' set for this 5 1/4 x 5 1/4 card. The large flower is stamped in Basic Gray and, for a little extra flair, 'Dare to be Fabulous' is stamped in Pink Passion.
The designer paper is from the Charbon set. To help the greeting pop a bit from the paper, I colored in parts with a white gel pen.
I added some dimension by lifting up the flowers (dimensionals) and creating the flower center piece using the 'squiggle' from Fabulous Flowers stamped in Pink Passion and punched out using the Trio Flower punch (I don't cut images if I don't have to).
Last touch, a bit of dazzling diamonds glitter on the flower center.
Maybe I was flashing back a bit to the 'Sgt. Pepper at 40' concert I saw with friends at the Hollywood Bowl last weekend ...
Thursday, August 9, 2007
True Friend ...
Off to LA in the morning to see friends (so no posting this weekend). In prep, stamped a lil' thank you note since we'll be staying at their house ...

I used the new 'True Friend' set and Apple Cider paper for this 3x3 card. All stamping in Elegant Eggplant ink. The snow blossom punch was a quick & easy way to pop the flower.
'Til next week ...

I used the new 'True Friend' set and Apple Cider paper for this 3x3 card. All stamping in Elegant Eggplant ink. The snow blossom punch was a quick & easy way to pop the flower.
'Til next week ...
Wednesday, August 8, 2007
Monkey Business ...
I've been wanting to do one of Beate's sketch challenges and tonight I did it! Here's my card for Weekend Sketch Challenge #13 ... I just dig this lil' monkey, he makes me smile ...


The lil' monkey is from SU's 'Zoofari.' I tried my hand at some watercoloring using Real Red and Mellow Moss inks. The greeting is from 'Warm Words' and is stamped in Real Red craft ink and then embossed with clear embossing powder.
I used paper from SU's Dashing designer paper collection and tied things off with a bit of twill tape.
I'll definitely be using this card layout again!
Tuesday, August 7, 2007
Quick Gift: Magnets ...
*sigh* I've been busy at work which means getting home late and that translates to not being able to get in some good stamping time. So, for a quick fix, I decided to make these magnets ...

I used a 1" Circle punch to pop out the flowers from SU's Big Pieces stamped in Purely Pomegranate, Wild Wasabi and Blue Bayou (oops, colors are a bit off in the photo). The punch creates a circle drops right into a bottle cap.
To create the shine - and make sure the image stays put inside the bottle cap - I colored over the images with a Versamarker and sprinkled in Glassy Glaze embossing powder then pulled out the heat gun ... heat ... sprinkle ... heat ... sprinkle ... heat ... keep repeating until you have the glaze & thickness you're looking for.
To finish things off, I added a mini glue dot in the center of each flower and sprinkled with some Dazzling Diamonds glitter.
Voila! Quick Gift.
Sunday, August 5, 2007
Embossed 'Brads' How-To ...
Some of you have asked for more information about how to use the Crop-A-Dile to emboss your cardstock into mini 'brads' ... so here ya' go!
First, set your Crop-A-Dile to A-1 ...
A Setting on the left
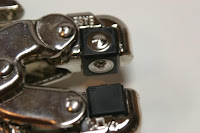
1 Setting on the right
Next, place your cardstock so that the side you want to feature the 'brads' is facing the 1-setting (on the right).
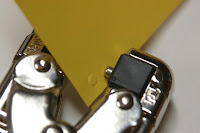
Lightly squeeze to create your embossed 'brads.' Be careful not to squeeze too hard - if you do, you'll punch a hole through your cardstock.
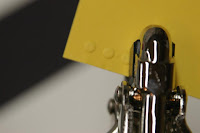
Have fun with your Crop-A-Dile!
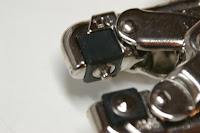
Update: Here are a couple tips for aligning your embossed 'brads' ...
First, set your Crop-A-Dile to A-1 ...
A Setting on the left

1 Setting on the right

Next, place your cardstock so that the side you want to feature the 'brads' is facing the 1-setting (on the right).

Lightly squeeze to create your embossed 'brads.' Be careful not to squeeze too hard - if you do, you'll punch a hole through your cardstock.

Have fun with your Crop-A-Dile!
Update: Here are a couple tips for aligning your embossed 'brads' ...
- To help with horizontal alignment, slide the cardstock all the way in to your Crop-A-Dile to make sure all 'brads' are embossed in an even row on your cardstock.
- To help with spacing between 'brads,' line up the black edge of your Crop-A-Dile's setting block (the blocks labeled A or 1) with the edge of the previously embossed 'brad'
Saturday, August 4, 2007
Convention Moments ...
Crazy busy at the day job this week so now getting caught up on a few things ... on the list of things to do: Create a Convention Photo Gallery. I noticed that Marie posted a few pics so that reminded me - hey! - I could post a few pics here before the full gallery comes together.
These are some shots from the last night of convention, "Awards & Entertainment Night," and entertaining it was! The band, Ryan Shupe & the Rubber Band, was great.
Musicians Are Stampers, Too!

Teamwork ...

Shelli announces a single convention for next year's 20th anniversary ...

Stamp Friends: Cheryl, me, Marie & Theresa ...

Me & Marie ...

Marie snaps a pic of herself & Jaron (I dig the glowing light effect) ...

And, I had to get a pic with Jaron, too. He's a super fun presenter & fab singer to boot!

Should be able to post a link to the full gallery soon ...
Thursday, August 2, 2007
Just For You ...
Wahoo! Another stamp promo offer - this month it's 30 free 'Love Notes' with purchase of the new Punch Box Kit. I seem to be hooked on the 3x3 notes so had fun using the new punch to make this card ...

For this 3x3 card, I also used the word window punch and the new scallop punch. The scalloped piece of Summer Sun is trimed to align to the edge of card. I attached it with dimensionals and then layered the greeting with SNAIL adhesive on the left and a dimensional on the right.
The image on the Wild Wasabi cardstock is from a single background stamp 'Happiness' stamped with Versamark.
Oh ... I was also trying out my new camera lens for this picture ...
Subscribe to:
Posts (Atom)