Tuesday, December 4, 2007

Books & Boards ...

In an attempt to get organized for the holidays, I decided to decorate a clipboard and a notebook to keep track of lists, receipts (thanks to a pocket) and other to-dos ... Great thing about these projects is all it takes is some designer paper & a glue stick!


I featured these projects at my class last week. Everyone chose their own designer paper - for my projects I used SU's Dashing paper (I'm a big fan of the simple geometric patterns and slightly retro holiday colors). For embellishemnts, I used some small chipboard pieces colored with craft ink (Old Olive, Very Vanilla, Real Red) ... and, some stamping with the Rough Edges alphabet and 'Snow Burst' stamp set.

I'm thinking I might make a few more of these for gifts ...

Saturday, December 1, 2007

Happy December!

Whew, so much for November. Too much going on to stamp, post ... but I'm determined to get back into the swing of creative things. To kick things off, a quick card that's great for the holidays or, change colors & images, and use the same layout for any occasion (birthday, wedding, 'just because').


I think the layout idea came from a sketch contest months back (sorry I can't recall which one, promise to post a link when/if I remember). Here's a bit more info about what I used:

Stamp Set: Season of Joy
Designer Paper: Holiday Harmony
Cardstock: Always Artichoke, Purely Pomegranate, Chocolate Chip, Whisper White
Ink: Purely Pomegranate, Always Artichoke
Extras: Chocolate Chip Satin Ribbon, Punches! (1 1/4" Circle, 1 3/8" Circle, Scallop Circle)

The 'Season of Joy' stamp set, 'Holiday Harmony' designer paper and satin ribbon were all from Stampin' Up!'s Holiday mini catalog.

I showed this card at my stamp class last month and I think it's safe to say it was a hit!

Here's to an enjoyable December!

Friday, October 26, 2007

Greetings from Mexico!

Hola! I had great plans to post some more projects before leaving on my Mexico trip - but that obviously didn't happen :) If I find a rubber stamp store here in Oaxaca I'll be sure to make a card and post!

Wednesday, October 17, 2007

A Lil' Birthday Greeting ...

Oh busy, busy, busy. Work hasn't left much time for stamping and I'm getting ready to go to Mexico next week. Maybe I had Mexico on my mind when I made this lil' birthday card for my niece.


This 3x3 card uses the Zoofari stamp set, stamped in black ink and colored with Pixie Pink and Tempting Turquoise markers. The greeting is from the Dias Felices stamp set - stamped in Tempting Turquoise.

The paper flowers were stamped using the Looks Like Spring stamp set and punched out with the Spring Flower Bouquet punch - I did this ages ago and tossed extras into a small glass jar.

Extra flowers and shapes are perfect to grab for a lil' embellishments!

Sunday, October 7, 2007

World Card Making Day ...

It was a busy day in the Stamp Garage. Started things off with 'Coffee & Cards' - some stamping accompanied by breakfast bread & beverages. Here are the cards that M. made for her son's first birthday party ...


These cards use the number 1 from the 'Headline Numbers' set stamped in Versamark and embossed with clear embossing powder. The bugs from the 'Bugs & Kisses' set are stamped in Chocolate Chip ink. (Both stamp sets Stampin' Up!)

After working on an art journal project I'm participating in, I decided to stamp some more cards to celebrate World Card Making Day. To keep things simple, I used the same basic layout for all of the cards I stamped today.

I'm a big Halloween fan and, since it's October, it seemed appropriate to make some more Halloween cards. I originally created these next two cards for my stamp class last month.

Both cards use a 3x3 piece of 'Creepy Crawly' designer paper. One side is a mosaic ...


The other side is black & webby ...

For both of the Halloween cards above, I stamped images from 'Autumn Apparitions' in Versamark and embossed with black embossing powder to create the silhouette effect. The greeting is also from 'Autumn Apparitions' and is stamped in Whisper White craft ink on black cardstock.

Next I decided to create a Halloween card that didn't use typical Halloween colors ...


The skull stamp and patterned paper are from Paper Source. I stamped the skull with Versamark on Very Vanilla cardstock and embossed with kaleidascope glitter embossing powder from JudiKins. Then I stamped 'Happy Halloween' from Stampin' Up!'s 'All Holidays' set in Versamark and embossed with Very Vanilla embossing powder. Mounted all on Chocolate Chip cardstock to finish things off.

For the last card of the evening, I decided to play with texture ...


For this card I used SU!'s 'True Friend' stamp set. I stamped the background in Chocolate Chip classic ink on vintage Japanese grass paper that my neighbor gave me (Thanks!). The greeting is stamped in Chocolate Chip craft ink on Very Vanilla cardstock and embossed with clear embossing powder. Mount all on Pumpkin Pie carstock and voila a Thank You card that reminds me of my aunt's pool house in the early '70s.

Time to sleep now ...

Friday, October 5, 2007

Zoiks!

Ack - been busy, busy, busy and haven't had much time to stamp or post. I'll be making some stuff tomorrow tho' for World Card Making Day and promise to post a picture or two.

Wednesday, September 26, 2007

Tiny Treat Tote ...

Getting ready for my monthly stamp class tomorrow and it's a Halloween theme. It seemed the perfect time to create a little treat bucket made from a Dixie cup ...


I saw these at convention and got a chance to make one at our quarterly stamp meeting a couple weeks ago (Thanks, Susan!). They're fund and easy to make. For this cup I used Stampin' Up!'s Creepy Crawly double-sided designer paper.

The Template: Simply (and gently) pull apart a Dixie cup to create your template. Remove the bottom circle leaving the sides of your cup. This is your template.

The Paper Cover: Use your template to trace onto designer paper (or whatever you'd like to use to cover your cup) and cut it out (paper snips or other thin-blade scissors work best).

To attach, I used Sticky Strip on both of the short ends of my piece of designer paper and, starting the seam on my new (not torn apart) cup, carefully wrapped the paper around until it overlapped the seam and the cup was completely covered. Use paper snips to trip off the extra designer paper that will be extending past the bottom of your cup.

Border & Handle: A strip of paper backed with sticky strip and wrapped around the lip of the cup makes the top border of the bucket ... another stip attached with brads is the handle.

Fill with your favorite goodie and enjoy!

Thursday, September 20, 2007

More Than a Brown Box ...

One of the great things about stamping and paper crafts is the flexibility ... make cards, scrapbook pages, gifts and even home decor items. I decided to combine a couple of these ideas and covered some simple boxes with patterned designer papers and ribbons. The boxes of course make great gift packages but they also make for nice holiday decor sitting on an entry table.


Paper: For these boxes, I used papers from the new SU Holiday Harmony double-sided designer paper from the Holiday Mini Collection.

Adhesive: When covering boxes, I recommend using a glue stick on the box and smoothing the paper down with a bone folder. Then, use some sticky strip (heavy duty double-sided tape) to tack down the edges. The designer paper will have some tension so using a heavy-duty adhesive will keep your edges down.

Ribbon: The ribbons are from SU's Theater set. The ribbon not only adds a great decorative edge, it also hides the seams between the top and sides of the box lids.

Label: For the front label on the square box, I used a piece of hardware from the Hodgepodge Hardware kit in Pewter. I punched a piece of white cardstock using the large oval punch and glued it behind the label frame with a bit of liquid glue. I'll handstamp a label once I figure out who the box is going to ... or what I want the box to contain.

Sunday, September 16, 2007

Card Swap ...

Yesterday was Patty's quartlery meeting - full of project tips, demos and make-n-takes. I presented some home decor ideas (will post pictures here soon) and demo'd making a 'paper pumpkin' (will teach this at my 'Halloween' stamp class on Sept 27).

Of course, it's not a meeting without card swaps. There were lots of great cards featuring stamps from SU's new Holiday Mini Collection. Here's my "quick card" swap ...


For my swap card, I used the new 'True Friend' stamp set from the Holiday Mini Collection. Cardstock colors are from the In Color series - Blue Bayou and Soft Sky (plus a small piece of Naturals White). I stamped images in Chocolate Chip ink and accented the card with a piece of 5/8" grosgrain ribbon in Chocolate Chip.

Of course, punches! I'm not a big fan of cutting things out so I love using punches. For this card, I used the new 3/16" corner rounder, the 1 3/8" circle, the 1" circle, the 1/4" circle and the Scallop circle punches. The final touch is a gold eyelet in the center of the 'flower.'

Tip: Here's a trick for centering the eyelet in the center of the flower image:

  • Punch a 1" circle from Soft Sky

  • Punch a 1/8" hole as close to center in the 1" circle as possible and set the eyelet.

  • Punch a 1/4" hole in the center of the flower - then use dimensionals to adhere the stamped image (punched out with a 1 3/8" circle punch) over the 1" circle so that the eyelet shows through in the center of the 1/4" hole. It doesn't matter if the 1" circle isn't perfectly centered in the 1 3/8" circle because you'll never see that part.

  • Use glue dots (or your favorite adhesive) on the back of the 1" circle to attach to the center of the Scallop circle.

  • Voila! Everything is centered.


Thanks to the punches there was no special cutting and this card went together quickly!

Wednesday, September 12, 2007

Thanks ...

Thanksgiving will be here before we know it (*gasp* the year's flying by). Here's a Thanksgiving card I designed over the weekend ... I'm still having fun playing with watercolors!

For this card, I used the new SU set "Autumn Harvest" stamped in StazOn Timber Brown on watercolor paper. To color the image, I used Pumpkin Pie and Old Olive inks.

The greeting is stamped in Versamark and embossed with Very Vanilla embossing powder on designer paper.

A little ribbon to finish things off ... this was a quick & fun card to make.

Sunday, September 9, 2007

Photo Galleries ...

Finally found time to create some photo galleries from the pics I took at the Stampin' Up! Convention this year. If you've ever wondered what happens at convention, take a peek and you'll get a glimpse of what goes on.

Once again, this year was full of great stamping projects & ideas!

Tuesday, September 4, 2007

Hello Halloween ...

I'm not sure where the Summer went - but September is indeed here and that means Fall and that means I'm starting to think about Halloween.

So, playing with some older designer paper and my new-found fascination with watercolor, I came up with these for a card drive ...


I wanted to keep the card design fairly simple in order to focus on the watercolored image. I used images from SU's 'Booglie Eyes' set stamped in StazOn black ink on watercolor paper. Then, armed with a small paint brush, cup o' water and a bit of extra ink in the lids of my ink pads I started coloring!


The 'Happy Halloween' greeting is from SU's new 'All Holidays' set. The dots were from the 'In the Spotlight' hostess set (the dots helped fill in some of the extra space on the horizontal cards)

I punched each image out with the tag punch and cut a larger tag from black cardstock.

Tip: To create the black tag matte, mount your punched tag to the black cardstock. Then trim the edges using the tag as a guide leaving a 1/8" space (more or less depending on how large you want the black tag to be). Each edge should be one cut so it should be a bit easier to keep the spacing even.

The ink colors I used: Pumpkin Pie, Old Olive, Lovely Lilac.


Punched a hole (using the Crop-A-Dile) and looped a bit of ribbon ...

For fun, I added some booglie eyes to the characters to finish things off.

Thursday, August 30, 2007

Stay Tuned ...

Spending some time in Ashland so no posting for a few days ... but I'll be posting pics of some Halloween cards that I made last weekend on Monday ...

Sunday, August 26, 2007

Handmade Greetings ...

Here's another card I created to teach at class last week. I got the idea for this card from one of the cards we made at convention - but I wanted to use punches & chipboard so here's what I came up with ...


To make this 3 x 6 inch card, I started with a 6 x 6 inch piece of textured white cardstock. Next, I cut a 1/4 inch off one side to make room for the scalloped edge.

Scalloped Edge: Using a 3/16" corner rounder punch, I removed the 'guide' from the punch and start punching half-circles overlapping slightly along the edge of the cardstock in order to create a scallped edge.

Chipboard & Flower Embellishments: I used a couple pieces of chipboard from the On Board Blossoms and Basics chipboard set. For the small flower, I colored it using a sponge dauber and Certainly Celery craft (pigment) ink. For the larger circle, I colored it using a sponger dauber and Rose Red craft (pigment) ink - then coated with a layer clear embossing powder (melted with a heat tool of course) to create a shine. For the center, I stamped 'Handmade' from the 'Art by Design' set in Bashful Blue on a scrap of Whisper White cardstock and punched it out with a 1 1/4" circle punch and attached with glue dots. Finally, I punched a few So Saffron flowers using the Trio Flower punch.

To bring it all together, I used a piece of Celery ribbon and a clip from the Antique Brass Hodgepodge Hardware kit.

The final touch, a 1" x 6" strip of designer paper from the 'Cutie Pie' series.

Hope you like it!

Tuesday, August 21, 2007

Potpourri ...

So getting ready for stamp class this week I wanted to see what I could create using designer paper, chipboard & punches ... a little of everything! The fun thing about this card is you can mix n' match papers, punches, embellishments -- pretty much anything goes!


For this version of my potpourri card, I used Old Olive cardstock (5 1/4 x 5 1/4) and textured Soft Sky cardstock (5 x 5) ... I softened the edges of both using the a 3/16" corner rounder punch.

Flower #1: I started with a piece of chipboard from SU On Board Blossoms & Basics covered in a piece of prints designer paper in Rose Red.


A Tip: When covering a flower in chipboard - trace your chipboard onto the designer paper and make a small mark on the chipboard and paper so that you know where to line things up after you cut out the flower. Glue stick works great for adhering the paper to the chipboard and a sanding block will take off the rough edges and give a bit of a 'shabby chic' look.


Next, I stamped and punched different shapes to create the 2nd and 3rd flowers ...

Flower #2: I stamped a 5-petal flower from SU's 'In the Spotlight' set in Pumpkin Pie on shimmery white cardstock. The new 5-Petal Flower punch pops it out perfectly. I punched a second 5-petal flower out of Certainly Celery.

Flower #3: The final flower uses another image from 'In the Spotlight' stamped in Groovy Guava on Groovy Guava cardstock and punched out with the new Snow Blossom punch. I punched a second piece in Lovely Lilac for layering.

Flower Centers: For the flower centers - embellishments - a couple buttons (clear button backed with a piece of So Saffron designer paper punched out with a 1" circle punch), a rhinestone brad and a bit of dazzling diamonds glitter on a glue dot.

Last touch ... paper piercing the stems and stamping a greeting from SU's 'Dias Felices' set in Soft Sky.

Celebrate!

Sunday, August 19, 2007

Play Time ...

Ah, after a week of no real stamping time, today was full day in the stamp garage. After playing a bit, I came up with this for Sketch This Card challenge #22 ...


For this card, I wanted to play with some things I haven't used in awhile. I aged the YoYo Yellow cardstock with Tim Holtz Distress Ink in Old Paper. To break down the fibers in the Taken with Teal cardstock, I rubbed the strip of cs back-n-forth over the edge of my work counter then lightly tugged back and forth, working my way down the cardstock until the fibers were loose. All cardstock is distressed on the edges using the SU Cutter Kit.

I stamped the rocket ship (JudiKins) in stamped-off Taken with Teal and then overstamped the saying (Stampers Anonymous) in Basic Gray.

Wish I could remember where I picked up the 'astro boy' paper ... luv the stuff ...

Saturday, August 18, 2007

Stamp Garage Storage ...

No stamping today. Instead, we spent the day installing 4 new Craftsman tool chests to increase the storage in my Stamp Garage. Yeah!

The Stamp Garage Before ... saw horses worked great to hold up my door-turned-countertop on one side but didn't offer much in the way of efficient storage.


The Stamp Garage During ... had to move everything over to the 'class room' side of the garage in order to move the counters and put in the new Craftsman rollaways (tho' I'm not using the wheels).


The Stamp Garage After ... Clean! I'm still figuring out how best to use all the drawers but at least for now, I have a big open space for stamping.


Tomorrow will definitely be a stamping day!

Wednesday, August 15, 2007

Fab ...

Ever have one of those days where you go to stamp and nothing comes together? I had one of those nights last night ... I think my brain couldn't handle all the options & choices.

So, tonight, back to the stamp garage. I simplified my color pallette and here's what I came up with ...


I used the SU 'Fabulous Flowers' set for this 5 1/4 x 5 1/4 card. The large flower is stamped in Basic Gray and, for a little extra flair, 'Dare to be Fabulous' is stamped in Pink Passion.

The designer paper is from the Charbon set. To help the greeting pop a bit from the paper, I colored in parts with a white gel pen.

I added some dimension by lifting up the flowers (dimensionals) and creating the flower center piece using the 'squiggle' from Fabulous Flowers stamped in Pink Passion and punched out using the Trio Flower punch (I don't cut images if I don't have to).

Last touch, a bit of dazzling diamonds glitter on the flower center.

Maybe I was flashing back a bit to the 'Sgt. Pepper at 40' concert I saw with friends at the Hollywood Bowl last weekend ...

Thursday, August 9, 2007

True Friend ...

Off to LA in the morning to see friends (so no posting this weekend). In prep, stamped a lil' thank you note since we'll be staying at their house ...


I used the new 'True Friend' set and Apple Cider paper for this 3x3 card. All stamping in Elegant Eggplant ink. The snow blossom punch was a quick & easy way to pop the flower.

'Til next week ...

Wednesday, August 8, 2007

Monkey Business ...

I've been wanting to do one of Beate's sketch challenges and tonight I did it! Here's my card for Weekend Sketch Challenge #13 ... I just dig this lil' monkey, he makes me smile ...


The lil' monkey is from SU's 'Zoofari.' I tried my hand at some watercoloring using Real Red and Mellow Moss inks. The greeting is from 'Warm Words' and is stamped in Real Red craft ink and then embossed with clear embossing powder.

I used paper from SU's Dashing designer paper collection and tied things off with a bit of twill tape.

I'll definitely be using this card layout again!

Tuesday, August 7, 2007

Quick Gift: Magnets ...

*sigh* I've been busy at work which means getting home late and that translates to not being able to get in some good stamping time. So, for a quick fix, I decided to make these magnets ...


I used a 1" Circle punch to pop out the flowers from SU's Big Pieces stamped in Purely Pomegranate, Wild Wasabi and Blue Bayou (oops, colors are a bit off in the photo). The punch creates a circle drops right into a bottle cap.

To create the shine - and make sure the image stays put inside the bottle cap - I colored over the images with a Versamarker and sprinkled in Glassy Glaze embossing powder then pulled out the heat gun ... heat ... sprinkle ... heat ... sprinkle ... heat ... keep repeating until you have the glaze & thickness you're looking for.

To finish things off, I added a mini glue dot in the center of each flower and sprinkled with some Dazzling Diamonds glitter.

Voila! Quick Gift.

Sunday, August 5, 2007

Embossed 'Brads' How-To ...

Some of you have asked for more information about how to use the Crop-A-Dile to emboss your cardstock into mini 'brads' ... so here ya' go!

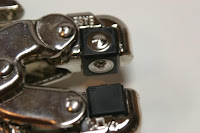
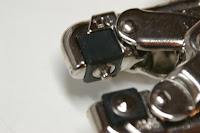
First, set your Crop-A-Dile to A-1 ...

A Setting on the left


1 Setting on the right


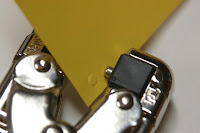
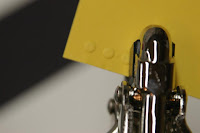
Next, place your cardstock so that the side you want to feature the 'brads' is facing the 1-setting (on the right).


Lightly squeeze to create your embossed 'brads.' Be careful not to squeeze too hard - if you do, you'll punch a hole through your cardstock.


Have fun with your Crop-A-Dile!

Update: Here are a couple tips for aligning your embossed 'brads' ...

  • To help with horizontal alignment, slide the cardstock all the way in to your Crop-A-Dile to make sure all 'brads' are embossed in an even row on your cardstock.


  • To help with spacing between 'brads,' line up the black edge of your Crop-A-Dile's setting block (the blocks labeled A or 1) with the edge of the previously embossed 'brad'